Quick answers to Common Questions
We’re here to help and answer any questions you might have. We look forward to hearing from you.
The Cost of Every Design is listed under the Model & Style Page for each Vehicle.
Yes, If part of the design, you get both sides. On some designs, there is only one piece.
Yes! Most kits have been designed to be installed by one person in about 60 to 80 minutes. View the step-by-step Instructions prior to begining installation.
No, it does not. In fact we have several customers who change their kits often for a new updated look. We also have customers who like one design so much, that they have the same style kit installed on their next new vehicle.
The Graphic Kits can easily be removed within the first year, after that you may need to heat them up with a blow dryer (Not a Heat Gun!) to warm them up and make it easier to remove them. The graphics are considered permanent since they are manufactured and tested to last for years in the harsh elements, but they can be removed at any time.
Most Liquid Detailing sprays and waxes are fine to use on decals. We have asked Sal Zaino to comment on this further, you can visit his website at www.zainostore.com
Zaino Show Car Polish works great on all vinyl decals. It is non-abrasive, leaves no white residue or wax buildup and actually makes the decals last longer. It’s UV40 protectant will keep the decals from shrinking, fading and drying out. Plus it will make the decals look like they have a clear coat over them. Try it on all the decals you’ll love it.
You can use Z-2, Z-5, Z-6 or Z-8
NOTE: For Flat Black or Matte Decals.
Try a test spot on the Flat Black decals and see if you like the look.It will make the decals have a slight gloss to them.. It boils down to amatter of personal preference.
No… Kits can be removed at any time, with a little effort, but they can not be re-used once they are removed. Please do a “dry fit” first. Before removing the backing paper, place the entire kit on the vehicle with some masking tape, and move it around until you are happy with the position. Then make reference points for the corners of the kit with masking tape on the car. When you remove the kit and begin the installation, you can place the kit back on your corner marks to make sure it’s exactly where you want it.
Yes, there are literally thousands of professional graphics installers located throughout the United States. You can also visit a local window tint shop and they will usually install the kit for a minimal fee.
YES. All Kits are listed with Standard Stock colors. Many Additional Colors and Special Order Colors are available for an Additional Fee. Check out our color chart to see what is available.
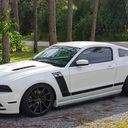
Look thru all of the Design options available for you vehicle, also look at the Photo Gallery for stripes already installed on customer cars.
Custom colors and custom kits can be made for an extra charge.
The premask is a See-thru layer on top of the kit which allows the kit to retain its shape when you place it on a vehicle. You squeegee the kit right through the pre-mask layer and pull it off when the kit is completely squeegeed onto the vehicle. If you are doing a wet installation, wait at least 15 minutes before removing the pre-mask layer. When you remove the premask, pull evenly and slowly, back at a sharp angle to avoid lifting the kit. Using your spray bottle, you can wet the top of the pre mask to soften it to aid in removal.
The best way to avoid bubbles in a kit is to take your time and make sure you have a clean surface. Squeeqee the kit SLOWLY, press FIRMLY, from front to back, working from the center to the outside, doing small sections of the kit at a time. Even then, you can get some small bubbles which can be removed later by using a pin or sharp blade to cut the edge of the bubble and work the air or water out through the opening. Kits can be installed wet or dry, but it is safer to install a kit wet. It can be pulled away from the vehicle during installation in case you get a fold or large bubble. A dry kit may have less bubbles at first, but its a one way street, and there’s no turning back. Once it’s on, IT’S ON!
You can do this yourself if you take your time, but for larger kits, it helps to have another person helping. That allows you to keep the kit away from the vehicle so you can peel off about a foot or two of the backing, starting at the front, spray the exposed kit, and then tack down the front of the kit onto the vehicle. By pressing down the first inch or so of the kit, you can proceed to remove the rest of the backing, exposing the kit and it’s adhesive backing, while the front of the kit stays put, and the back of the kit is held away from the vehicle to avoid unwanted placement. It is important to keep the kit taught, or lightly pulled, to keep the kit from bunching up. Once you completely remove the backing, spray the entire kit and start to squeegee from the front to the back as your helper keeps the back end of the kit about 6 inches away from the vehicle. If you are by yourself, just lightly place the back of the kit down and tack the corners in place. As you squeegee the kit, you might start to bunch up the kit. You should be able to lift (snap) it up again, and re-tension it as needed. Wait 15 minutes and remove the premask pulling back at a sharp angle to avoid lifting the kit.
All of our Vinyl Graphics Kits are Custom order items and require prepayment before shipping. Custom or special order items are items that are made to order, special size or other non-stocking items. Absolutely no returns, credits, or exchanges once any pieces are Manufactured.
Please make sure of your purchase before committing to the Payment, there will be no returns or refunds once the order is finalized.
It is the customer’s responsibility to open the package and inspect the items upon delivery. Packages that appear to be damaged should be immediately reported to the freight carrier. Damage due to shipping is the sole responsibility of the freight carrier. All claims are to be made by the customer directly with the carrier. Shipping carriers will not honor late claims.
All items should be inspected for defects or damage and “dry fitted” prior to being installed. Installation instructions provided should be followed completely.
Couldn't Find an Answer?
We’re here to help and answer any questions you might have. We look forward to hearing from you.
Happy Customers